
object_detection_en.md 36 KB
简体中文 | English
General Object Detection Pipeline Tutorial
1. Introduction to General Object Detection Pipeline
Object detection aims to identify the categories and locations of multiple objects in images or videos by generating bounding boxes to mark these objects. Unlike simple image classification, object detection not only requires recognizing what objects are present in an image, such as people, cars, and animals, but also accurately determining the specific position of each object within the image, typically represented by rectangular boxes. This technology is widely used in autonomous driving, surveillance systems, smart photo albums, and other fields, relying on deep learning models (e.g., YOLO, Faster R-CNN) that can efficiently extract features and perform real-time detection, significantly enhancing the computer's ability to understand image content.
👉Details of Model List
| Model | mAP(%) | GPU Inference Time (ms) | CPU Inference Time (ms) | Model Size (M) | Description |
|---|---|---|---|---|---|
| Cascade-FasterRCNN-ResNet50-FPN | 41.1 | - | - | 245.4 M | Cascade-FasterRCNN is an improved version of the Faster R-CNN object detection model. By coupling multiple detectors and optimizing detection results using different IoU thresholds, it addresses the mismatch problem between training and prediction stages, enhancing the accuracy of object detection. |
| Cascade-FasterRCNN-ResNet50-vd-SSLDv2-FPN | 45.0 | - | - | 246.2 M | |
| CenterNet-DLA-34 | 37.6 | - | - | 75.4 M | CenterNet is an anchor-free object detection model that treats the keypoints of the object to be detected as a single point—the center point of its bounding box, and performs regression through these keypoints. |
| CenterNet-ResNet50 | 38.9 | - | - | 319.7 M | |
| DETR-R50 | 42.3 | 59.2132 | 5334.52 | 159.3 M | DETR is a transformer-based object detection model proposed by Facebook. It achieves end-to-end object detection without the need for predefined anchor boxes or NMS post-processing strategies. |
| FasterRCNN-ResNet34-FPN | 37.8 | - | - | 137.5 M | Faster R-CNN is a typical two-stage object detection model that first generates region proposals and then performs classification and regression on these proposals. Compared to its predecessors R-CNN and Fast R-CNN, Faster R-CNN's main improvement lies in the region proposal aspect, using a Region Proposal Network (RPN) to provide region proposals instead of traditional selective search. RPN is a Convolutional Neural Network (CNN) that shares convolutional features with the detection network, reducing the computational overhead of region proposals. |
| FasterRCNN-ResNet50-FPN | 38.4 | - | - | 148.1 M | |
| FasterRCNN-ResNet50-vd-FPN | 39.5 | - | - | 148.1 M | |
| FasterRCNN-ResNet50-vd-SSLDv2-FPN | 41.4 | - | - | 148.1 M | |
| FasterRCNN-ResNet50 | 36.7 | - | - | 120.2 M | |
| FasterRCNN-ResNet101-FPN | 41.4 | - | - | 216.3 M | |
| FasterRCNN-ResNet101 | 39.0 | - | - | 188.1 M | |
| FasterRCNN-ResNeXt101-vd-FPN | 43.4 | - | - | 360.6 M | |
| FasterRCNN-Swin-Tiny-FPN | 42.6 | - | - | 159.8 M | |
| FCOS-ResNet50 | 39.6 | 103.367 | 3424.91 | 124.2 M | FCOS is an anchor-free object detection model that performs dense predictions. It uses the backbone of RetinaNet and directly regresses the width and height of the target object on the feature map, predicting the object's category and centerness (the degree of offset of pixels on the feature map from the object's center), which is eventually used as a weight to adjust the object score. |
| PicoDet-L | 42.6 | 16.6715 | 169.904 | 20.9 M | PP-PicoDet is a lightweight object detection algorithm designed for full-size and wide-aspect-ratio targets, with a focus on mobile device computation. Compared to traditional object detection algorithms, PP-PicoDet boasts smaller model sizes and lower computational complexity, achieving higher speeds and lower latency while maintaining detection accuracy. |
| PicoDet-M | 37.5 | 16.2311 | 71.7257 | 16.8 M | |
| PicoDet-S | 29.1 | 14.097 | 37.6563 | 4.4 M | |
| PicoDet-XS | 26.2 | 13.8102 | 48.3139 | 5.7 M | |
| PP-YOLOE_plus-L | 52.9 | 33.5644 | 814.825 | 185.3 M | PP-YOLOE_plus is an iteratively optimized and upgraded version of PP-YOLOE, a high-precision cloud-edge integrated model developed by Baidu PaddlePaddle's Vision Team. By leveraging the large-scale Objects365 dataset and optimizing preprocessing, it significantly enhances the end-to-end inference speed of the model. |
| PP-YOLOE_plus-M | 49.8 | 19.843 | 449.261 | 82.3 M | |
| PP-YOLOE_plus-S | 43.7 | 16.8884 | 223.059 | 28.3 M | |
| PP-YOLOE_plus-X | 54.7 | 57.8995 | 1439.93 | 349.4 M | |
| RT-DETR-H | 56.3 | 114.814 | 3933.39 | 435.8 M | RT-DETR is the first real-time end-to-end object detector. It features an efficient hybrid encoder that balances model performance and throughput, efficiently processes multi-scale features, and introduces an accelerated and optimized query selection mechanism to dynamize decoder queries. RT-DETR supports flexible end-to-end inference speeds through the use of different decoders. |
| RT-DETR-L | 53.0 | 34.5252 | 1454.27 | 113.7 M | |
| RT-DETR-R18 | 46.5 | 19.89 | 784.824 | 70.7 M | |
| RT-DETR-R50 | 53.1 | 41.9327 | 1625.95 | 149.1 M | |
| RT-DETR-X | 54.8 | 61.8042 | 2246.64 | 232.9 M | |
| YOLOv3-DarkNet53 | 39.1 | 40.1055 | 883.041 | 219.7 M | YOLOv3 is a real-time end-to-end object detector that utilizes a unique single Convolutional Neural Network (CNN) to frame the object detection problem as a regression task, enabling real-time detection. The model employs multi-scale detection to enhance performance across different object sizes. |
| YOLOv3-MobileNetV3 | 31.4 | 18.6692 | 267.214 | 83.8 M | |
| YOLOv3-ResNet50_vd_DCN | 40.6 | 31.6276 | 856.047 | 163.0 M | |
| YOLOX-L | 50.1 | 185.691 | 1250.58 | 192.5 M | Building upon YOLOv3's framework, YOLOX significantly boosts detection performance in complex scenarios by incorporating Decoupled Head, Data Augmentation, Anchor Free, and SimOTA components. |
| YOLOX-M | 46.9 | 123.324 | 688.071 | 90.0 M | |
| YOLOX-N | 26.1 | 79.1665 | 155.59 | 3.4 M | |
| YOLOX-S | 40.4 | 184.828 | 474.446 | 32.0 M | |
| YOLOX-T | 32.9 | 102.748 | 212.52 | 18.1 M | |
| YOLOX-X | 51.8 | 227.361 | 2067.84 | 351.5 M |
2. Quick Start
PaddleX's pre-trained model pipelines allow for quick experience of their effects. You can experience the effects of the General Object Detection Pipeline online or locally using command line or Python.
2.1 Online Experience
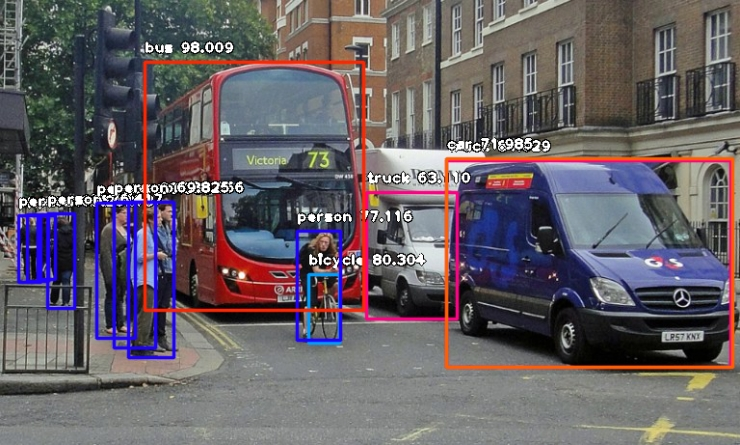
You can experience the General Object Detection Pipeline online using the demo images provided by the official source, for example:
If you are satisfied with the pipeline's performance, you can directly integrate and deploy it. If not, you can also use your private data to fine-tune the model within the pipeline.
2.2 Local Experience
Before using the General Object Detection Pipeline locally, ensure you have installed the PaddleX wheel package following the PaddleX Local Installation Tutorial.
2.2.1 Command Line Experience
A single command can quickly experience the effects of the object detection pipeline, Use the test file, and replace --input with the local path to perform prediction.
paddlex --pipeline object_detection --input general_object_detection_002.png --device gpu:0
Parameter Explanation:
--pipeline: The name of the pipeline, here it is the object detection pipeline.
--input: The local path or URL of the input image to be processed.
--device: The GPU index to use (e.g., gpu:0 indicates using the first GPU, gpu:1,2 indicates using the second and third GPUs). You can also choose to use CPU (--device cpu).
When executing the above command, the default object detection pipeline configuration file is loaded. If you need to customize the configuration file, you can execute the following command to obtain it:
Click to expand 👉
```bash paddlex --get_pipeline_config object_detection ``` After execution, the object detection pipeline configuration file will be saved in the current path. If you wish to customize the save location, you can execute the following command (assuming the custom save location is `./my_path`): ```bash paddlex --get_pipeline_config object_detection --save_path ./my_path ``` After obtaining the pipeline configuration file, replace `--pipeline` with the configuration file save path to make the configuration file effective. For example, if the configuration file save path is `./object_detection.yaml`, simply execute: ```bash paddlex --pipeline ./object_detection.yaml --input general_object_detection_002.png --device gpu:0 ``` Here, parameters such as `--model` and `--device` do not need to be specified, as they will use the parameters in the configuration file. If these parameters are still specified, the specified parameters will take precedence.After running, the result will be:
{'input_path': 'general_object_detection_002.png', 'boxes': [{'cls_id': 49, 'label': 'orange', 'score': 0.8188097476959229, 'coordinate': [661, 93, 870, 305]}, {'cls_id': 47, 'label': 'apple', 'score': 0.7743489146232605, 'coordinate': [76, 274, 330, 520]}, {'cls_id': 47, 'label': 'apple', 'score': 0.7270504236221313, 'coordinate': [285, 94, 469, 297]}, {'cls_id': 46, 'label': 'banana', 'score': 0.5570532083511353, 'coordinate': [310, 361, 685, 712]}, {'cls_id': 47, 'label': 'apple', 'score': 0.5484835505485535, 'coordinate': [764, 285, 924, 440]}, {'cls_id': 47, 'label': 'apple', 'score': 0.5160726308822632, 'coordinate': [853, 169, 987, 303]}, {'cls_id': 60, 'label': 'dining table', 'score': 0.5142655968666077, 'coordinate': [0, 0, 1072, 720]}, {'cls_id': 47, 'label': 'apple', 'score': 0.5101479291915894, 'coordinate': [57, 23, 213, 176]}]}

The visualized image not saved by default. You can customize the save path through --save_path, and then all results will be saved in the specified path.
2.2.2 Integration via Python Scripts
A few lines of code are all you need to quickly perform inference on your production line. Taking General Object Detection as an example:
from paddlex import create_pipeline

pipeline = create_pipeline(pipeline="object_detection")

output = pipeline.predict("general_object_detection_002.png")
for res in output:
    res.print()  # Print the structured output of the prediction
    res.save_to_img("./output/")  # Save the visualized image of the result
    res.save_to_json("./output/")  # Save the structured output of the prediction
The results obtained are the same as those from the command line method.
In the above Python script, the following steps are executed:
(1) Instantiate the create_pipeline to create a pipeline object: The specific parameter descriptions are as follows:
| Parameter | Description | Type | Default |
|---|---|---|---|
pipeline |
The name of the pipeline or the path to the pipeline configuration file. If it's a pipeline name, it must be supported by PaddleX. | str |
None |
device |
The device for pipeline model inference. Supports: "gpu", "cpu". | str |
"gpu" |
enable_hpi |
Whether to enable high-performance inference, only available if the pipeline supports it. | bool |
False |
(2) Call the predict method of the pipeline object to perform inference: The predict method parameter x is used to input data to be predicted, supporting multiple input methods, as shown in the following examples:
| Parameter Type | Description |
|---|---|
| Python Var | Supports directly passing Python variables, such as numpy.ndarray representing image data. |
str |
Supports passing the path of the file to be predicted, such as the local path of an image file: /root/data/img.jpg. |
str |
Supports passing the URL of the file to be predicted, such as the network URL of an image file: Example. |
str |
Supports passing a local directory, which should contain files to be predicted, such as the local path: /root/data/. |
dict |
Supports passing a dictionary type, where the key needs to correspond to the specific task, such as "img" for image classification tasks, and the value of the dictionary supports the above data types, e.g., {"img": "/root/data1"}. |
list |
Supports passing a list, where the list elements need to be of the above types, such as [numpy.ndarray, numpy.ndarray], ["/root/data/img1.jpg", "/root/data/img2.jpg"], ["/root/data1", "/root/data2"], [{"img": "/root/data1"}, {"img": "/root/data2/img.jpg"}]. |
(3) Obtain the prediction results by calling the predict method: The predict method is a generator, so prediction results need to be obtained through iteration. The predict method predicts data in batches, so the prediction results are in the form of a list.
(4)Process the prediction results: The prediction result for each sample is of dict type and supports printing or saving to files, with the supported file types depending on the specific pipeline. For example:
| Method | Description | Method Parameters |
|---|---|---|
| Prints results to the terminal | - format_json: bool, whether to format the output content with json indentation, default is True;- indent: int, json formatting setting, only valid when format_json is True, default is 4;- ensure_ascii: bool, json formatting setting, only valid when format_json is True, default is False; |
|
| save_to_json | Saves results as a json file | - save_path: str, the path to save the file, when it's a directory, the saved file name is consistent with the input file type;- indent: int, json formatting setting, default is 4;- ensure_ascii: bool, json formatting setting, default is False; |
| save_to_img | Saves results as an image file | - save_path: str, the path to save the file, when it's a directory, the saved file name is consistent with the input file type; |
If you have a configuration file, you can customize the configurations of the image anomaly detection pipeline by simply modifying the pipeline parameter in the create_pipeline method to the path of the pipeline configuration file.
For example, if your configuration file is saved at ./my_path/object_detection.yaml, you only need to execute:
from paddlex import create_pipeline
pipeline = create_pipeline(pipeline="./my_path/object_detection.yaml")
output = pipeline.predict("general_object_detection_002.png")
for res in output:
    res.print()  # Print the structured output of prediction
    res.save_to_img("./output/")  # Save the visualized image of the result
    res.save_to_json("./output/")  # Save the structured output of prediction
3. Development Integration/Deployment
If the pipeline meets your requirements for inference speed and accuracy, you can proceed with development integration/deployment.
If you need to directly apply the pipeline in your Python project, refer to the example code in 2.2.2 Python Script Integration.
Additionally, PaddleX provides three other deployment methods, detailed as follows:
🚀 High-Performance Inference: In actual production environments, many applications have stringent standards for the performance metrics of deployment strategies, especially response speed, to ensure efficient system operation and smooth user experience. To this end, PaddleX provides high-performance inference plugins aimed at deeply optimizing model inference and pre/post-processing to significantly speed up the end-to-end process. Refer to the PaddleX High-Performance Inference Guide for detailed High-Performance Inference procedures.
☁️ Service-Oriented Deployment: Service-oriented deployment is a common deployment form in actual production environments. By encapsulating inference functions as services, clients can access these services through network requests to obtain inference results. PaddleX supports users in achieving low-cost service-oriented deployment of pipelines. Refer to the PaddleX Service-Oriented Deployment Guide for detailed service-oriented deployment procedures.
Below are the API references and multi-language service invocation examples:
API Reference
For all operations provided by the service: - Both the response body and the request body for POST requests are JSON data (JSON objects). - When the request is processed successfully, the response status code is `200`, and the response body properties are as follows: | Name | Type | Description | |------|------|-------------| | `errorCode` | `integer` | Error code. Fixed as `0`. | | `errorMsg` | `string` | Error description. Fixed as `"Success"`. | The response body may also have a `result` property of type `object`, which stores the operation result information. - When the request is not processed successfully, the response body properties are as follows: | Name | Type | Description | |------|------|-------------| | `errorCode` | `integer` | Error code. Same as the response status code. | | `errorMsg` | `string` | Error description. | Operations provided by the service are as follows: - **`infer`** Performs object detection on an image. `POST /object-detection` - The request body properties are as follows: | Name | Type | Description | Required | |------|------|-------------|----------| | `image` | `string` | The URL of an image file accessible by the service or the Base64 encoded result of the image file content. | Yes | - When the request is processed successfully, the `result` of the response body has the following properties: | Name | Type | Description | |------|------|-------------| | `detectedObjects` | `array` | Information about the location and category of the detected objects. | | `image` | `string` | The image of the object detection result. The image is in JPEG format and encoded in Base64. | Each element in `detectedObjects` is an `object` with the following properties: | Name | Type | Description | |------|------|-------------| | `bbox` | `array` | The location of the object. The elements in the array are the x-coordinate of the top-left corner, the y-coordinate of the top-left corner, the x-coordinate of the bottom-right corner, and the y-coordinate of the bottom-right corner of the bounding box, respectively. | | `categoryId` | `integer` | The ID of the object category. | | `score` | `number` | The score of the object. | An example of `result` is as follows: ```json { "detectedObjects": [ { "bbox": [ 404.4967956542969, 90.15770721435547, 506.2465515136719, 285.4187316894531 ], "categoryId": 0, "score": 0.7418514490127563 }, { "bbox": [ 155.33145141601562, 81.10954284667969, 199.71136474609375, 167.4235382080078 ], "categoryId": 1, "score": 0.7328268885612488 } ], "image": "xxxxxx" } ```Multilingual Service Invocation Examples
Python
```python import base64 import requests API_URL = "http://localhost:8080/object-detection" image_path = "./demo.jpg" output_image_path = "./out.jpg" with open(image_path, "rb") as file: image_bytes = file.read() image_data = base64.b64encode(image_bytes).decode("ascii") payload = {"image": image_data} response = requests.post(API_URL, json=payload) assert response.status_code == 200 result = response.json()["result"] with open(output_image_path, "wb") as file: file.write(base64.b64decode(result["image"])) print(f"Output image saved at {output_image_path}") print("\nDetectedobjects:") print(result["detectedObjects"]) ```C++
```cpp #include #include "cpp-httplib/httplib.h" // https://github.com/Huiyicc/cpp-httplib #include "nlohmann/json.hpp" // https://github.com/nlohmann/json #include "base64.hpp" // https://github.com/tobiaslocker/base64 int main() { httplib::Client client("localhost:8080"); const std::string imagePath = "./demo.jpg"; const std::string outputImagePath = "./out.jpg"; httplib::Headers headers = { {"Content-Type", "application/json"} }; std::ifstream file(imagePath, std::ios::binary | std::ios::ate); std::streamsize size = file.tellg(); file.seekg(0, std::ios::beg); std::vector buffer(size); if (!file.read(buffer.data(), size)) { std::cerr << "Error reading file." << std::endl; return 1; } std::string bufferStr(reinterpret_cast(buffer.data()), buffer.size()); std::string encodedImage = base64::to_base64(bufferStr); nlohmann::json jsonObj; jsonObj["image"] = encodedImage; std::string body = jsonObj.dump(); auto response = client.Post("/object-detection", headers, body, "application/json"); if (response && response->status == 200) { nlohmann::json jsonResponse = nlohmann::json::parse(response->body); auto result = jsonResponse["result"]; encodedImage = result["image"]; std::string decodedString = base64::from_base64(encodedImage); std::vector decodedImage(decodedString.begin(), decodedString.end()); std::ofstream outputImage(outPutImagePath, std::ios::binary | std::ios::out); if (outputImage.is_open()) { outputImage.write(reinterpret_cast(decodedImage.data()), decodedImage.size()); outputImage.close(); std::cout << "Output image saved at " << outPutImagePath << std::endl; } else { std::cerr << "Unable to open file for writing: " << outPutImagePath << std::endl; } auto detectedObjects = result["detectedObjects"]; std::cout << "\nDetectedobjects:" << std::endl; for (const auto& category : detectedObjects) { std::cout << category << std::endl; } } else { std::cout << "Failed to send HTTP request." << std::endl; return 1; } return 0; } ```Java
```java import okhttp3.*; import com.fasterxml.jackson.databind.ObjectMapper; import com.fasterxml.jackson.databind.JsonNode; import com.fasterxml.jackson.databind.node.ObjectNode; import java.io.File; import java.io.FileOutputStream; import java.io.IOException; import java.util.Base64; public class Main { public static void main(String[] args) throws IOException { String API_URL = "http://localhost:8080/object-detection"; String imagePath = "./demo.jpg"; String outputImagePath = "./out.jpg"; File file = new File(imagePath); byte[] fileContent = java.nio.file.Files.readAllBytes(file.toPath()); String imageData = Base64.getEncoder().encodeToString(fileContent); ObjectMapper objectMapper = new ObjectMapper(); ObjectNode params = objectMapper.createObjectNode(); params.put("image", imageData); OkHttpClient client = new OkHttpClient(); MediaType JSON = MediaType.Companion.get("application/json; charset=utf-8"); RequestBody body = RequestBody.Companion.create(params.toString(), JSON); Request request = new Request.Builder() .url(API_URL) .post(body) .build(); try (Response response = client.newCall(request).execute()) { if (response.isSuccessful()) { String responseBody = response.body().string(); JsonNode resultNode = objectMapper.readTree(responseBody); JsonNode result = resultNode.get("result"); String base64Image = result.get("image").asText(); JsonNode detectedObjects = result.get("detectedObjects"); byte[] imageBytes = Base64.getDecoder().decode(base64Image); try (FileOutputStream fos = new FileOutputStream(outputImagePath)) { fos.write(imageBytes); } System.out.println("Output image saved at " + outputImagePath); System.out.println("\nDetectedobjects: " + detectedObjects.toString()); } else { System.err.println("Request failed with code: " + response.code()); } } } } ```Go
```go package main import ( "bytes" "encoding/base64" "encoding/json" "fmt" "io/ioutil" "net/http" ) func main() { API_URL := "http://localhost:8080/object-detection" imagePath := "./demo.jpg" outputImagePath := "./out.jpg" imageBytes, err := ioutil.ReadFile(imagePath) if err != nil { fmt.Println("Error reading image file:", err) return } imageData := base64.StdEncoding.EncodeToString(imageBytes) payload := map[string]string{"image": imageData} payloadBytes, err := json.Marshal(payload) if err != nil { fmt.Println("Error marshaling payload:", err) return } client := &http.Client{} req, err := http.NewRequest("POST", API_URL, bytes.NewBuffer(payloadBytes)) if err != nil { fmt.Println("Error creating request:", err) return } res, err := client.Do(req) if err != nil { fmt.Println("Error sending request:", err) return } defer res.Body.Close() body, err := ioutil.ReadAll(res.Body) if err != nil { fmt.Println("Error reading response body:", err) return } type Response struct { Result struct { Image string `json:"image"` Detectedobjects []map[string]interface{} `json:"detectedObjects"` } `json:"result"` } var respData Response err = json.Unmarshal([]byte(string(body)), &respData) if err != nil { fmt.Println("Error unmarshaling response body:", err) return } outputImageData, err := base64.StdEncoding.DecodeString(respData.Result.Image) if err != nil { fmt.Println("Error decoding base64 image data:", err) return } err = ioutil.WriteFile(outputImagePath, outputImageData, 0644) if err != nil { fmt.Println("Error writing image to file:", err) return } fmt.Printf("Image saved at %s.jpg\n", outputImagePath) fmt.Println("\nDetectedobjects:") for _, category := range respData.Result.Detectedobjects { fmt.Println(category) } } ```C#
```csharp using System; using System.IO; using System.Net.Http; using System.Net.Http.Headers; using System.Text; using System.Threading.Tasks; using Newtonsoft.Json.Linq; class Program { static readonly string API_URL = "http://localhost:8080/object-detection"; static readonly string imagePath = "./demo.jpg"; static readonly string outputImagePath = "./out.jpg"; static async Task Main(string[] args) { var httpClient = new HttpClient(); byte[] imageBytes = File.ReadAllBytes(imagePath); string image_data = Convert.ToBase64String(imageBytes); var payload = new JObject{ { "image", image_data } }; var content = new StringContent(payload.ToString(), Encoding.UTF8, "application/json"); HttpResponseMessage response = await httpClient.PostAsync(API_URL, content); response.EnsureSuccessStatusCode(); string responseBody = await response.Content.ReadAsStringAsync(); JObject jsonResponse = JObject.Parse(responseBody); string base64Image = jsonResponse["result"]["image"].ToString(); byte[] outputImageBytes = Convert.FromBase64String(base64Image); File.WriteAllBytes(outputImagePath, outputImageBytes); Console.WriteLine($"Output image saved at {outputImagePath}"); Console.WriteLine("\nDetectedobjects:"); Console.WriteLine(jsonResponse["result"]["detectedObjects"].ToString()); } } ```Node.js
```js const axios = require('axios'); const fs = require('fs'); const API_URL = 'http://localhost:8080/object-detection' const imagePath = './demo.jpg' const outputImagePath = "./out.jpg"; let config = { method: 'POST', maxBodyLength: Infinity, url: API_URL, data: JSON.stringify({ 'image': encodeImageToBase64(imagePath) }) }; function encodeImageToBase64(filePath) { const bitmap = fs.readFileSync(filePath); return Buffer.from(bitmap).toString('base64'); } axios.request(config) .then((response) => { const result = response.data["result"]; const imageBuffer = Buffer.from(result["image"], 'base64'); fs.writeFile(outputImagePath, imageBuffer, (err) => { if (err) throw err; console.log(`Output image saved at ${outputImagePath}`); }); console.log("\nDetectedobjects:"); console.log(result["detectedObjects"]); }) .catch((error) => { console.log(error); }); ```PHP
<?php

$API_URL = "http://localhost:8080/object-detection";
$image_path = "./demo.jpg";
$output_image_path = "./out.jpg";

$image_data = base64_encode(file_get_contents($image_path));
$payload = array("image" => $image_data);

$ch = curl_init($API_URL);
curl_setopt($ch, CURLOPT_POST, true);
curl_setopt($ch, CURLOPT_POSTFIELDS, json_encode($payload));
curl_setopt($ch, CURLOPT_RETURNTRANSFER, true);
$response = curl_exec($ch);
curl_close($ch);

$result = json_decode($response, true)["result"];
file_put_contents($output_image_path, base64_decode($result["image"]));
echo "Output image saved at " . $output_image_path . "\n";
echo "\nDetectedobjects:\n";
print_r($result["detectedObjects"]);

?>
📱 Edge Deployment: Edge deployment is a method that places computing and data processing functions on user devices themselves, allowing devices to process data directly without relying on remote servers. PaddleX supports deploying models on edge devices such as Android. Refer to the PaddleX Edge Deployment Guide for detailed edge deployment procedures.
Choose the appropriate deployment method for your model pipeline based on your needs, and proceed with subsequent AI application integration.
4. Custom Development
If the default model weights provided by the General Object Detection pipeline do not meet your requirements for precision or speed in your specific scenario, you can try to further fine-tune the existing model using your own domain-specific or application-specific data to improve the recognition performance of the General Object Detection pipeline in your scenario.
4.1 Model Fine-tuning
Since the General Object Detection pipeline includes an object detection module, if the performance of the pipeline does not meet expectations, you need to refer to the Custom Development section in the Object Detection Module Development Tutorial and use your private dataset to fine-tune the object detection model.
4.2 Model Application
After fine-tuning the model with your private dataset, you will obtain local model weights files.
If you need to use the fine-tuned model weights, simply modify the pipeline configuration file by replacing the local path of the fine-tuned model weights to the corresponding location in the pipeline configuration file:
......
Pipeline:
  model: PicoDet-S  # Can be modified to the local path of the fine-tuned model
  device: "gpu"
  batch_size: 1
......
Then, refer to the command line method or Python script method in the local experience, and load the modified pipeline configuration file.
5. Multi-Hardware Support
PaddleX supports various mainstream hardware devices such as NVIDIA GPUs, Kunlun XPU, Ascend NPU, and Cambricon MLU. Simply modify the --device parameter to seamlessly switch between different hardware.
For example, if you use an NVIDIA GPU for inference of the General Object Detection pipeline, the Python command is:
paddlex --pipeline object_detection --input general_object_detection_002.png --device gpu:0
``````
At this point, if you wish to switch the hardware to Ascend NPU, simply modify the `--device` in the Python command to `npu:0`:
bash paddlex --pipeline object_detection --input general_object_detection_002.png --device npu:0 ``` If you want to use the General Object Detection Pipeline on more types of hardware, please refer to the PaddleX Multi-Device Usage Guide.